
この記事の3行要約
- SharePointリストのアイテムにカスタムボタンを配置し、押下するだけでPower Automateのフローを直接実行できるようにする実装方法を解説
- 列の書式設定(JSON)にフローのGUIDを指定するだけで、複数手順を省略しワンクリックで起動できる
- ボタン実行に必要な権限設定や、アイコン付きなどのデザインカスタマイズ例も紹介
SharePointリストにボタンを設置してPower Automateを実行する仕組みは、SharePoint運用を効率化する機能拡張の一例です。同様に業務効率化につながる機能追加を検討されている方は、以下のサービスもあわせてご参照ください。




こんにちは。アーティサン株式会社の小刀稱(ことね)です。

小刀稱 知哉ことね ともや
得意領域
Power PlatformやSharePointを中心に設計・開発・アドバイス・教育まで幅広く担当しています。内製化をご希望の場合はお気軽にお問い合わせください!
保有資格
皆さん、SharePoint上からPower Automateを実行する方法をご存知ですか?
標準であれば、SharePointリストやライブラリのアイテム横の3点リーダー→自動化→対象のフロー名(以下では「データのコピー」という名前) を選択することで、Power Automateを実行できます。
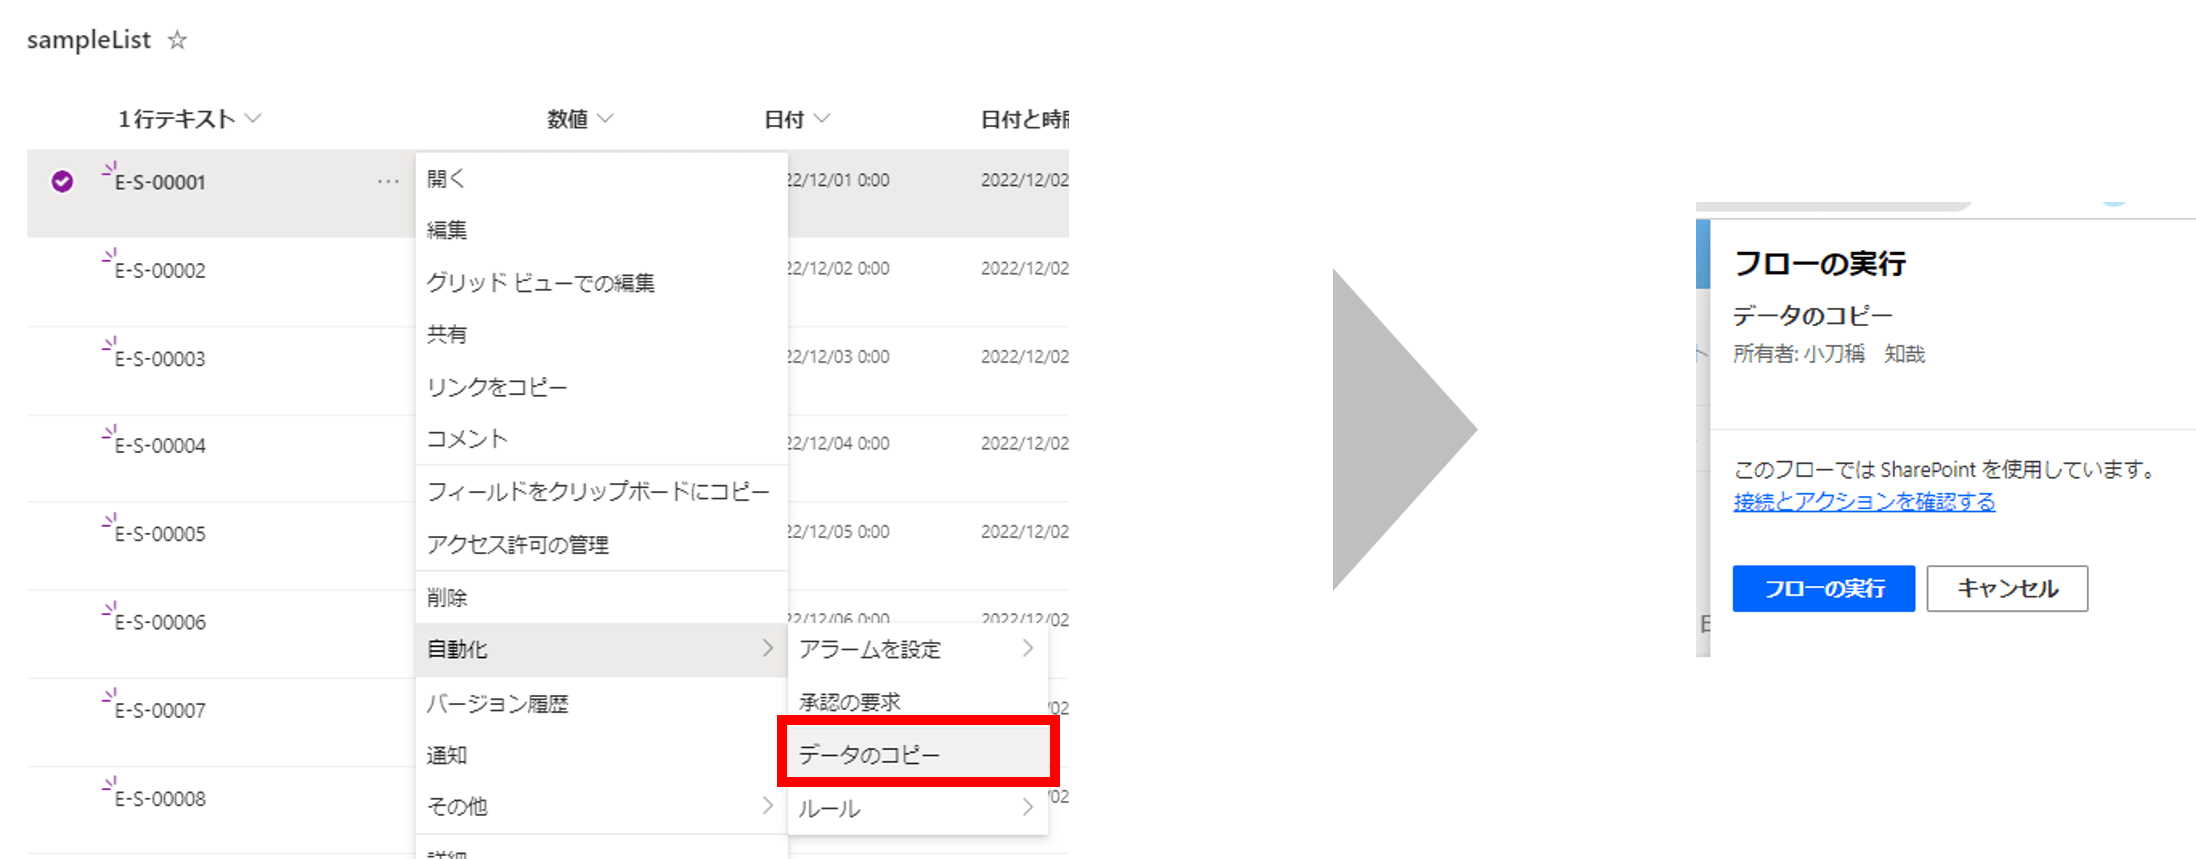
しかし上記の方法では、フローを実行するまでの手順が多いため、フローの存在を知らない人は実行することが難しいのではないでしょうか。
そこで、今回は小ネタとしてSharePointリストにボタンを配置し、ボタン押下時にPower Automateを実行する方法について紹介します。
やりたいこと
今回はSharePointリスト上にボタンを配置します。
そしてそのボタンを押下すると、値をコピーするPower Automateを実行する機能を実装します。
イメージは以下です。

実装方法
実装の手順は以下のとおりです。
Power Automateの作成
まずは、Power Automateの作成です。
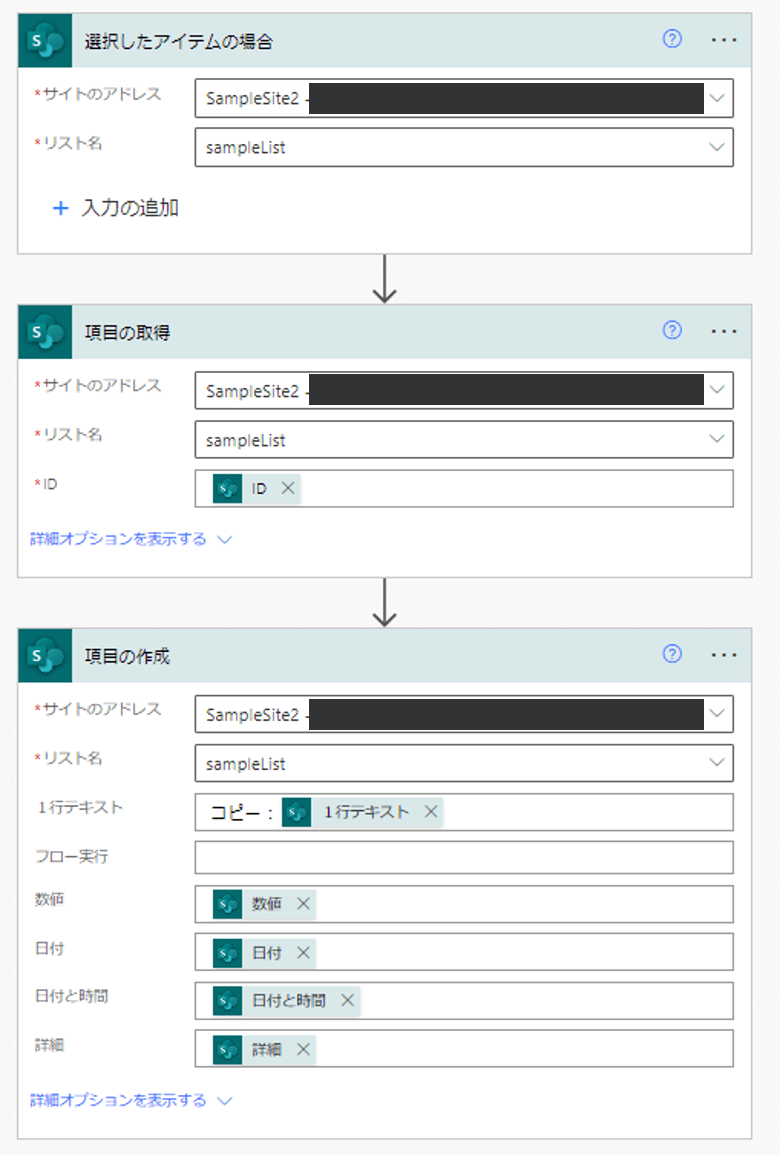
内容としては選択したアイテムの値をコピーする機能を実装しています。
また詳細は割愛しますが、トリガーとしては選択したアイテムの場合を使用しています。
作成したフローは以下です。
Power AutomateのGUIDを取得
続いて、作成したPower AutomateのGUIDを取得します。
先程のPower Automateの詳細画面に遷移してください。
本画面のURL部分にGUIDに含まれています。
(以下赤字部分がGUIDです。)
https://make.powerautomate.com/environments/Default-xxxxxxxxxxxx/flows/c14cde3b-8755-4e9c-8d2b-70d0914c83f8/details

SharePointの書式設定でボタンを作成
それでは、SharePointリスト上にボタンを作成し、Power Automateを実行できるようにしましょう。
こちらではJSONを用いてボタンを作成します。
手順は以下です。
新しい列(1行テキスト)を作成(※今回は「フロー実行」という列名で作成)
「この列の書式設定」 → 詳細モード からJSONを記載する画面を表示
以下のJSONを記載
{
  "$schema": "https://developer.microsoft.com/json-schemas/sp/v2/column-formatting.schema.json",
  "elmType": "button",
  "txtContent": "値のコピー",
  "customRowAction": {
  	"action": "executeFlow",
  	"actionParams": "{\"id\": \"c14cde3b-8755-4e9c-8d2b-70d0914c83f8\"}"
  }
}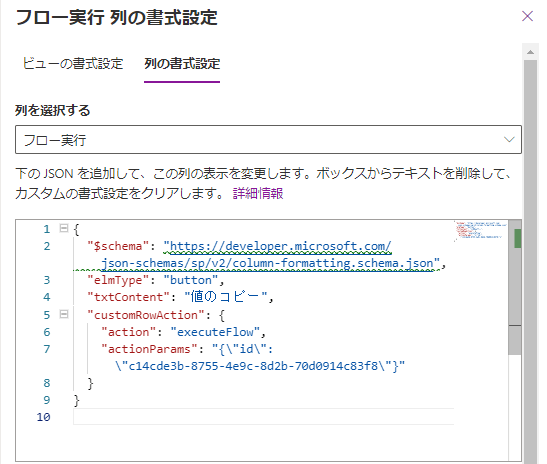
ポイントとしては、上記の赤字部分に先程取得したPower AutomateのGUIDを指定することです。
これにより、ボタンを押下すると指定されたPower Automateが実行されるようになります。
)
Power Automateの権限設定
上記までの手順で、機能の実装は完了です。
最後にPower Automateを共有することで、フローにアクセス許可を与えてください。
※実行権限が与えられていないユーザーは、「ボタンが見えているが、押下しても何も反応しない」という状態となります。
共有に関する詳細については、以下URLを参照してください。
クラウド フローを共有する
補足:ボタンのデザインを変更したい
先程作成したボタンはデザインを何も設定していないので、簡素なデザインになっています。
JSONを活用することで、きれいなボタンを作成することも可能ですので、挑戦してみてください!
(HTML To Formatterを用いると、HTMLやCSSをJSONに変換することを手助けしてくれます。)
HTML To Formatter
ボタンのサンプル1(リッチなデザイン)
以下では、デザインをリッチにしたサンプルボタンを紹介します。
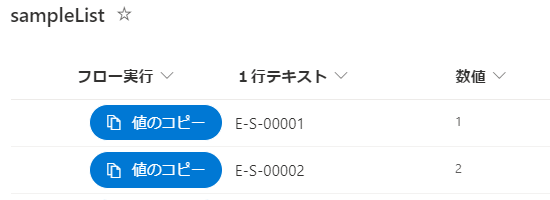
JSONは以下のとおりです。
{
  "$schema": "https://developer.microsoft.com/json-schemas/sp/v2/column-formatting.schema.json",
  "elmType": "div",
  "style": {
    "width": "100%",
    "height": "100%",
    "position": "absolute",
    "margin": "auto"
  },
  "children": [
    {
      "elmType": "button",
      "customRowAction": {
        "action": "executeFlow",
        "actionParams": "{\"id\":   \"<Flow ID>\"}"
      },
      "style": {
        "border": "solid 1px #ffffff",
        "border-radius": "55px",
        "display": "flex",
        "justify-content": "center",
        "align-items": "center",
        "padding": "6px 15px",
        "margin": "0 auto"
      },
      "attributes": {
        "class": "ms-bgColor-communicationPrimary ms-bgColor-communicationShade20--hover ms-fontColor-white"
      },
      "children": [
        {
          "elmType": "span",
          "style": {
            "margin-right": "10px"
          },
          "attributes": {
            "iconName": "Copy"
          }
        },
        {
          "elmType": "span",
          "txtContent": "値のコピー"
        }
      ]
    }
  ]
}
ボタンのサンプル2(ステータスに応じて、ボタンのデザインを変更)
下では、ステータス列の値に応じて、ボタンのデザインを変更しています。
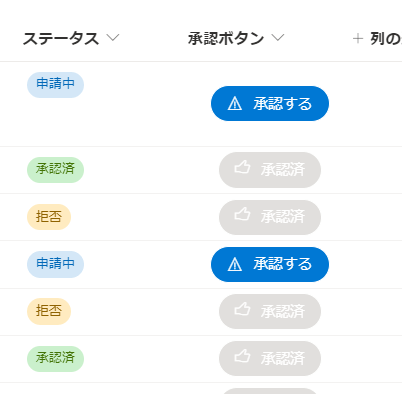
JSONは以下のとおりです。
{
  "$schema": "https://developer.microsoft.com/json-schemas/sp/v2/column-formatting.schema.json",
  "elmType": "div",
  "style": {
    "width": "100%",
    "height": "100%",
    "position": "absolute",
    "margin": "auto"
  },
  "children": [
    {
      "elmType": "button",
      "customRowAction": {
        "action": "executeFlow",
        "actionParams": "{\"id\": \"<Flow ID>\"}"
      },
      "style": {
        "border": "solid 1px #ffffff",
        "border-radius": "55px",
        "display": "=if([$Status]=='申請中', 'flex', 'none')",
        "justify-content": "center",
        "align-items": "center",
        "padding": "6px 15px",
        "margin": "0 auto"
      },
      "attributes": {
        "class": "ms-bgColor-communicationPrimary ms-bgColor-communicationShade20--hover ms-fontColor-white"
      },
      "children": [
        {
          "elmType": "span",
          "style": {
            "margin-right": "10px"
          },
          "attributes": {
            "iconName": "Warning"
          }
        },
        {
          "elmType": "span",
          "txtContent": "承認する"
        }
      ]
    },
    {
      "elmType": "button",
      "style": {
        "border": "solid 1px #ffffff",
        "border-radius": "55px",
        "display": "=if([$Status]!='申請中','','none')",
        "justify-content": "center",
        "align-items": "center",
        "padding": "6px 15px",
        "margin": "0 auto"
      },
      "attributes": {
        "class": "ms-bgColor-gray40 ms-fontColor-white"
      },
      "children": [
        {
          "elmType": "span",
          "style": {
            "margin-right": "10px"
          },
          "attributes": {
            "iconName": "Like"
          }
        },
        {
          "elmType": "span",
          "txtContent": "承認済"
        }
      ]
    }
  ]
}
おわりに
今回は、小ネタとしてSharePointリストにボタンを配置し、ボタン押下時にPower Automateを実行する方法について紹介しました。
JSONを使いこなすことができるとSharePointの表現の幅が拡がるので、ぜひ覚えていただきたい内容です。
(実は、X-SP | SharePoint デザイン・機能拡張サービスもJSONを活用することで実装していたりします(笑))
最後まで読んでいただき、ありがとうございました!
本記事で紹介したJSONによるボタンカスタマイズの考え方は、SharePointの見た目や操作性を作り込むデザイン拡張にも応用できます。SharePointのUI/UXをさらに磨き込みたい場合は、以下のサービスもご検討ください。